Combatting Grease in a Commercial Kitchen
Grease can be one of the most frustrating things to clean; it tends to stick to just about anything that it touches. It can spread in splashes, but also in vapor, leaving small droplets all around your kitchen that you might not notice until the next time you cook.

Grease can easily find its way around the space,
becoming potentially hazardous for employee falls or grease fires.
With the high volume of cooking in commercial kitchens, it is essential to be able to handle grease cleanup because grease can easily find its way around the space, becoming potentially hazardous via injury or fire. Carbonized grease and grease residue can be red flags for inspectors, too, as there are quite a few adverse effects it can have on a kitchen. Uncleaned grease can lead to sanitation issues and odors while attracting pests, the bane of those trying to survive restaurant health inspections.
This guide is designed to help you tackle just about any form of grease, prevent spills, and clean yourself after exposure to grease.
The Ultimate Guide to Cleaning Grease
Grease can build up in a kitchen quickly, especially if it is not being cleaned on a regular basis. Many commercial kitchen owners tend to overlook the importance of having the right cleaning tools for their restaurants, and some even cut corners, explicitly disobeying FDA guidelines.
It is vital that both the employer and employees have the knowledge and equipment to safely maintain a commercial kitchen. Obtaining the right cleaning products is a great way to start. Ensuring that cross-contamination is eliminated, the correct agents are used at each stage, and proper procedures are followed should take priority in the kitchen.
Degreasing Kitchen Walls, Floors, & Ceiling
Over time, grease can find its way to just about every corner of your kitchen. The longer that you wait to remove it, the harder it can be to get clean. The process used to clean is relatively simple yet can appear daunting as it can be time-consuming. Regular degreasing throughout the day can make end-of-shift deep cleaning much more straightforward.
- Understand the surface you are cleaning and what cleaner(s) you need to use to get the job done.

- Smaller areas and quick touchups can usually be handled by using a cleaning and degreasing wipe.
- If your walls are painted it would be advisable to start the cleaning process by using the gentlest method available, such as using plain water and a sponge before moving on to a chemical cleaner. Walls and ceilings may require a different solution, as not all cleaners will work on your painted surfaces. Be sure to check the manufacture guidelines on the label of your products and consider a spot test in a less-visible area. Consider wearing Personal Protective Equipment (PPE), depending on your degreasing chemical of choice.

2. The Process
- Start by dusting/sweeping the surface.
- Blot the grease away using a dry wipe. If needed, you can use warm water to soften splatters and stains so that wiping will become easier.
- Using a ready-to-use product or degreasing wipe, rub in circular motion, working in sections.


Stains caused by grease may take a little more effort to remove, but the process will be similar. Continue to wipe the grease away until it all comes off. If you are working on a ceiling, try not to over-douse your sponge. Rather than using a ladder repeatedly, you can use a dedicated mop to clean ceilings and the upper areas of walls.
Degreasing Stoves and Counters
It is recommended that you frequently clean your stove and countertops. Keeping wipes nearby and accessible is a great way to promote prompt and regular cleaning.
Stoves are known for being notoriously hard to clean, though they typically can handle chemical cleaners better than other surfaces. Remove your heating coils and drip pans after clearing debris away, then begin by coating the surface in a cleaning solution. Most chemical cleaners work better if you give them time to penetrate the surface of the grease; this is especially important if the grease is burnt or carbonized on the surface. Once the solution has set, you can begin wiping away the grease. A heavy duty wipe can also be effective at scrubbing grease away.
When cleaning countertops it is especially important to know what type of counter you are dealing with. Each type of countertop has its own cleaning and maintenance needs, and must be treated accordingly. Using an abrasive sponge might work well on granite, but if you have marble countertops, you run the risk of scratching the surface. Pay close attention to the ingredients in the cleaner you are using, as some surfaces don’t react well to certain chemicals.
Degreasing Handheld Kitchen Appliances
Many kitchen appliances that are commonly used are going to come into contact with food. While it is generally safe to use chemical cleaners on these appliances, you also run the risk of those chemicals sticking to the surfaces of them as well. After cleaning, be sure to rinse and sanitize appliances prior to use on food.
Cleaning Yourself Up After a Grease Spill or Splash
It is all too common to come into contact with grease during cooking or cleaning. No matter how you get it on you, you will want to remove it.
Treating Grease Burns

Grease burns are one of the most painful ways to come into contact with grease. Depending on the severity of the burn, you may need to seek immediate medical attention.
After being burned by grease, you should run the burn area under cool (not cold) tap water to alleviate residual heat, so long as an open blister has not formed. Use a gentle stream of water, as a stronger stream may cause further damage to the skin. Remove any jewelry and tight-fitting clothing after rinsing as the affected area may start to swell.
A blister may form, but it is important not to pop it, as bacteria can enter through the wound. Loosely wrap the burn making sure no loose lint or substances come into contact with the burn site. If an open blister forms, avoid running cool water over the blister and apply a sterile dry bandage to the area.
How to Get Grease Out of Clothes
If you need to get grease out of your clothing, there are a few methods you can use. You can pour dish soap or detergent onto the stain, rub it with a toothbrush, and then run it through a normal washer cycle.
If soap and detergent didn’t do the trick, you can try using WD-40, baking soda, and soap. Start by spraying a light amount of WD-40 onto the stain, then cover it with baking soda and scrub. The grease should mix with the WD-40 and bind to the baking soda, though multiple applications may be needed. Once the grease is removed, rub liquid soap or detergent onto the stain before sending it through the wash. Grease will become more difficult to remove the longer it has set, and the more times the clothing has been washed with the grease still on it.

How to Get Grease off Your Hands
Removing grease from your hands is much more straightforward than removing it from clothing or walls. Sometimes washing your hands with only soap will not remove all the greases on your skin. We recommend trying to add a little sugar to the soap to increase abrasion or using hand sanitizing and antibacterial wipes, which are safe to use regularly.

Grease buildup is a sanitary problem in restaurant kitchens, and most states mandate that grease traps be cleaned regularly. If left uncleaned, it carbonizes, accumulates substances, and can become a breeding ground for bacteria, among other sanitary issues. The more proactive you are about cleaning grease, the easier the process will be.
Best Practices to Minimize Grease Spills
The easiest way to minimize grease spills is to make sure that they don’t occur in the first place. Grease is a foodservice by-product that kitchens must constantly manage, and its accumulation in areas is virtually inevitable. Splatters and stains can be cleaned fairly easily, but spills can be far more tedious to deal with. Preventing these spills can reduce the amount of waste in prep and serving areas, help prevent employees from slipping, and reduce the probability of sanitation issues.
Storing Grease
Typically a vendor will supply a container for grease, and the size of the container should correlate to how much grease is produced in the kitchen daily. If the grease trap from one or two fryers is being dumped weekly in a lower volume kitchen, then a more modest container may be enough. If the kitchen is operating in a substantial volume, it might be a better idea to use a higher capacity container.
In any event, coordinate with your restaurant’s vendor to ensure you have the right sized containers and waste removal schedule. Always plan to empty the container before it is full to help minimize the risk of a spill. Lastly, these containers should be stored in areas favorable to streamlining the transfer of grease, as well as the disposal of the container’s contents.
Proper Steps to Dispose of Grease
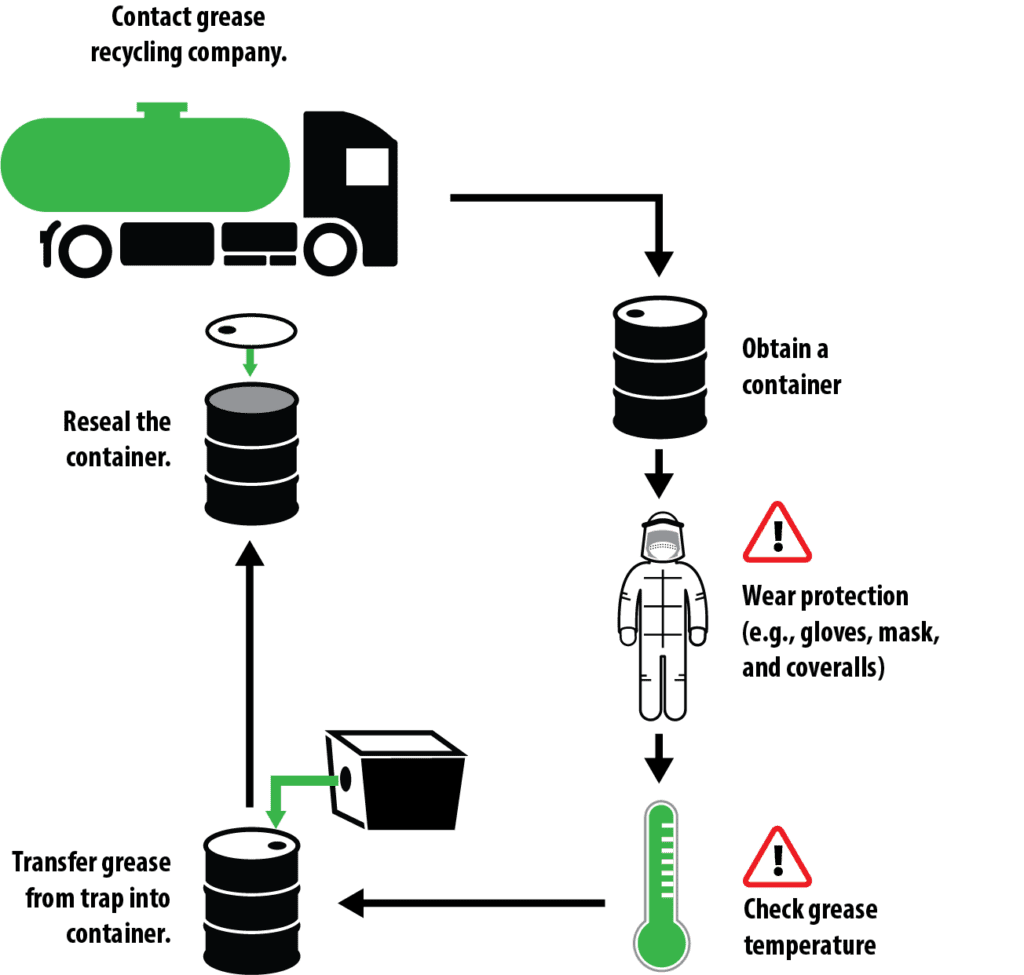
Steps and considerations for responsible disposal of spent or used grease in a restaurant include:
- Contact a vendor/grease recycling company.
- Obtain a container, typically provided by the vendor.
- Wear protection such as gloves, mask, and coveralls.
- Check grease temperature, and make sure the fryer is off.
- Remove the lid from the container.
- Transfer grease from trap into container.
- Reseal the container.
It is also important to keep drains clean, as this will prevent clogging and reduce the chance that vermin such as flies will be in the kitchen.
Grease buildup is a sanitary problem in restaurant kitchens, and most states mandate that grease traps be cleaned regularly. If left uncleaned, it carbonizes, accumulates substances, and can become a breeding ground for bacteria, among other sanitary issues. The more proactive you are about cleaning grease, the easier the process will be.
